
What makes a text element into an entry field?
One checkbox. Is Text Input, in the Text Properties panel, turns an ordinary text element into a field a Learner can type into.
There is no separate prompt field to fill in. The element's own text is what the Learner reads before they type, so whatever you put in the element is the prompt.
That leaves two ways in, depending on whether the screen already has text you can use:
- Text Add creates a new text element where you want the field.
- Text Extract turns text that is already part of the screen image into an element you can use.
How do you create a text entry field with new text?
Step |
Action |
|---|---|
| 1 | Open the screen in Replica Maker. If you have just converted screenshots to Replicas, the converted screens open in Replica Maker for you. Otherwise, go to your Learning Program's Screen Library, click the ... menu on the screen you want, and select Edit. |
| 2 | Select Text Add in the Replica Maker toolbar. |
| 3 | Click and drag over the area where you want the field. A New Text Line element appears. |
| 4 | Double-click the element and type the prompt you want the Learner to see. Triple-click first to select the default wording and replace it in one go. |
| 5 | Adjust the color and size in the Text Properties panel so the prompt reads clearly on the screen. |
| 6 | Check Is Text Input in Text Properties. |
| 7 | Rename the element in the ID field, keeping the "txt" prefix, so you can find it later. |
| 8 | Click Update to save the screen, then Close. |
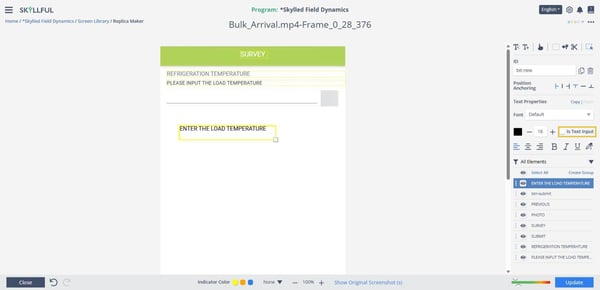
Is Text Input turns the selected text element into a field the Learner can type into.
Note: Step 7 is worth doing here even though renaming is optional elsewhere. The ID comes in as txt-new and it does not change when you edit the text, so a screen with two new elements gives you nothing to tell them apart by. A name like txt-loadTemp is what you will be looking for when you wire the field into a Lesson step.
How do you create a text entry field from text already on the screen?
Step |
Action |
|---|---|
| 1 | Select Text Extract in the Replica Maker toolbar. |
| 2 | Click and drag over the text you want to convert. Skyllful creates an element with the same wording. |
| 3 | Click the new element. |
| 4 | Edit the text into a prompt for the Learner if the original wording does not work as one. |
| 5 | Check the Font setting and adjust the color and size in the Text Properties panel. |
| 6 | Check Is Text Input in Text Properties. |
| 7 | Rename the element in the ID field, keeping the "txt" prefix. |
| 8 | Click Update to save the screen, then Close. |
Note: Extracted elements often come in with Font reading "Unknown Font!" because Skyllful could not identify the original. Set the font yourself if the prompt needs to match the screen around it.
What happens next?
The field exists on the Replica, but a Learner cannot type into it until the element is added as a control on a Lesson step. That work happens in the Lesson Builder, along with setting the answers you will accept. See Modify Lesson Steps for adding controls to a step, and Develop a Lesson in Practice Mode and Develop a Lesson in Knowledge Check Mode for accepted answers, including how to accept more than one correct entry.
What if text entry does not work?
If the edit icons for a screen are greyed out, the screen is part of a published lesson and cannot be edited until that lesson is unpublished.
For anything else, contact your Local Administrator first. If your Local Administrator cannot resolve the issue, submit a case through the Skyllful support portal.
Skyllful Knowledge Base | Content Developers, Instructional Designers