
Why would you select an element?
A Replica is built in two layers. Conversion creates the background, which is fixed, and elements are the named regions on top of it. Only elements can be changed, and nothing can be changed until it is selected, so selecting is the first move in almost every edit you make in Replica Maker.
Once an element is selected you can:
- Move it. Drag the selection, or nudge it with the arrow keys.
- Resize it. Drag one of the handles on the selection.
- Restyle it. For a text element, the Text Properties panel opens so you can change the font, color, size, alignment, and weight.
- Copy or cut it. Ctrl + C copies, Ctrl + X cuts, and Ctrl + V pastes, including onto a different screen.
- Duplicate or delete it. Use Duplicate Element and Delete Element in the panel on the right.
- Line it up. With several elements selected, align their edges or set their position anchoring.
Selecting more than one element lets you do all of this to the whole group in a single move, which is what makes Selection Mode worth learning.
Note: The control sits at the right end of the Replica Maker toolbar, a dotted rectangle with a cursor arrow over it. Its tooltip in Skyllful Studio reads Selection Mode.
How do you select a single element?
Step |
Action |
|---|---|
| 1 | Open the screen in Replica Maker. If you have just converted screenshots to Replicas, the converted screens open in Replica Maker for you. Otherwise, go to your Learning Program's Screen Library, click the ... menu on the screen you want, and select Edit. |
| 2 | Click Selection Mode (the dotted rectangle with a cursor arrow at the right end of the Replica Maker toolbar). |
| 3 | Click the element on the screen. Handles appear around it, its name appears in the ID field, and its row highlights in the All Elements list. |
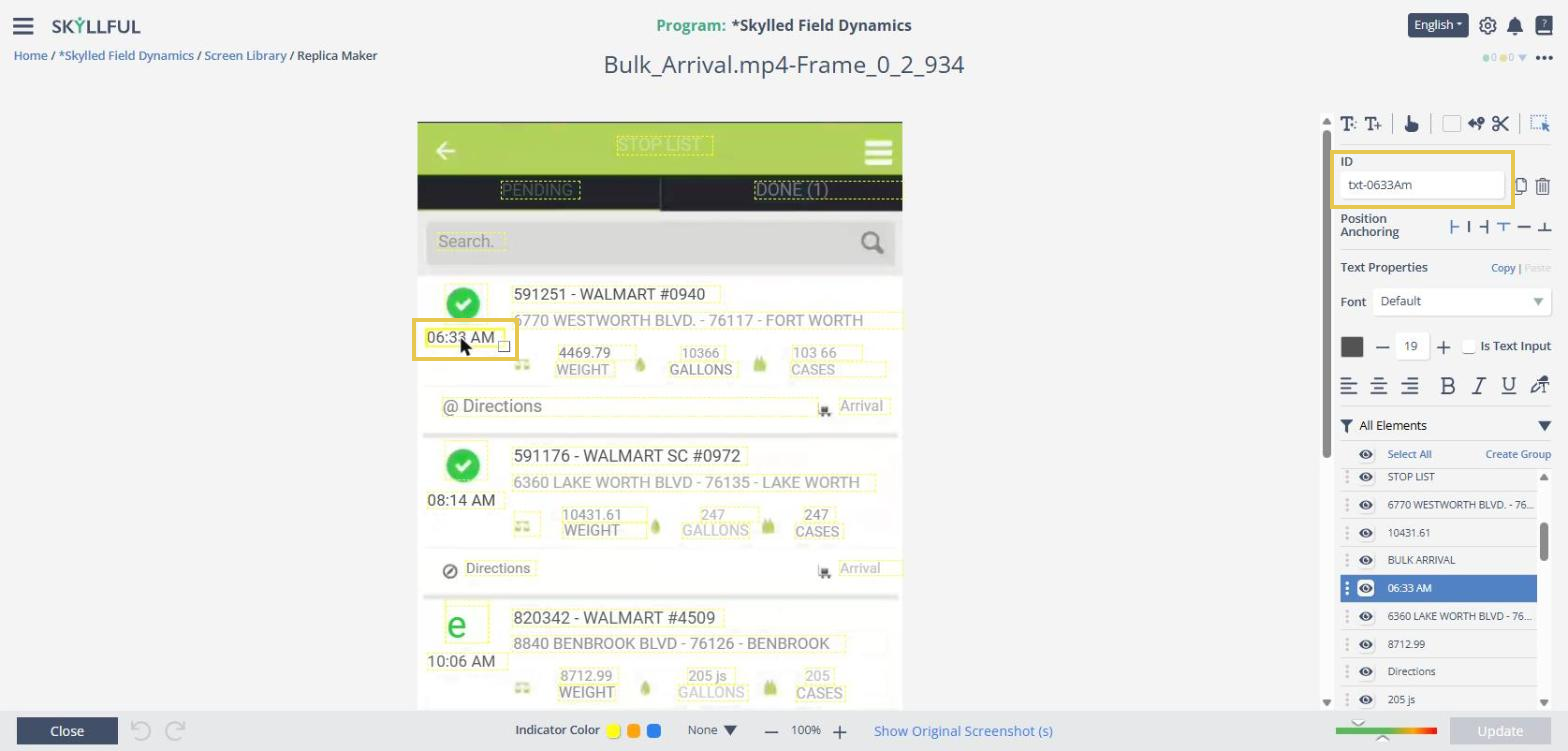
One element selected. Its name lands in the ID field and Text Properties opens below.
The panel on the right now shows what you can do with that one element. For a text element that includes Text Properties, so you can restyle it without leaving the selection.
How do you select several elements?
Step |
Action |
|---|---|
| 1 | With Selection Mode on, click and drag a selection box around the elements you want. Every element inside the box is selected, each with its own handles, and every one of them highlights in the All Elements list. |
| 2 | To add one more element, hold Ctrl and click it, either on the screen or on its row in the All Elements list. Repeat for each element you want to add. |
| 3 | To take an element back out, hold Ctrl and click it again. The rest of the selection stays as it is. |
.gif?width=621&height=300&name=lasso-tool_select-elements%20(1).gif)
Drag a box around the elements you want, then Ctrl+click to add any strays.
Note: Each new selection box replaces the one before it, so drag once around the largest area you need and add or remove the rest with Ctrl+click. Holding Shift does not add to a selection, and neither does holding Ctrl while you drag a second box.
How do you align and anchor a selection?
With more than one element selected, two sets of controls appear at the top of the panel on the right.
Align Edges snaps every selected element to one shared edge, so a column of labels that drifted a few pixels out of true lines up in a single click. Four controls cover the vertical and horizontal edges.
Position Anchoring sets the edge that the selected elements are anchored to. Six controls cover the left, right, top, and bottom edges.
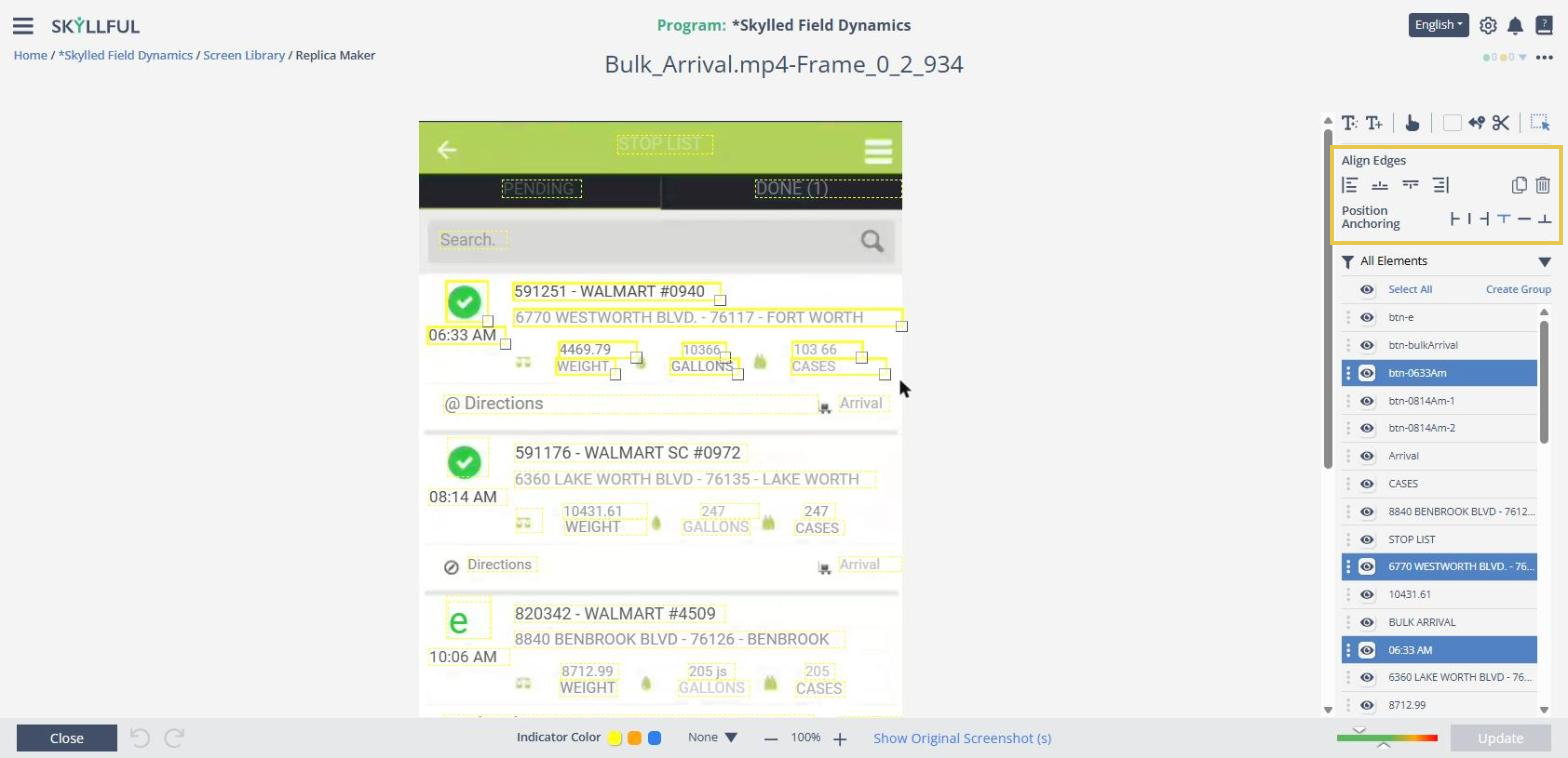
With more than one element selected, the panel switches to bulk actions.
Note: Align Edges moves the elements you have selected. If the result is not what you wanted, use the undo arrow at the bottom of the editor before you click Update.
How do you clear a selection?
Step |
Action |
|---|---|
| 1 | Click anywhere outside the selected area. |
What if Selection Mode does not work?
Contact your Local Administrator first. If your Local Administrator cannot resolve the issue, submit a case through the Skyllful support portal.
Skyllful Knowledge Base | Content Developers, Instructional Designers