
Why does this distinction matter?
Lesson Builder puts two different scopes on one screen. The upper area and the bottom bar act on the whole Lesson. The step cards below act only on the step you are working in.
Nearly every expensive mistake in Lesson Builder comes from mixing the two up: styling one step and wondering why the others did not change, or reaching for a command that quietly changed all fifteen. Once you can tell the layers apart, the screen stops being ambiguous.
What affects the whole Lesson?
Everything above the first step card, plus the bar along the bottom.
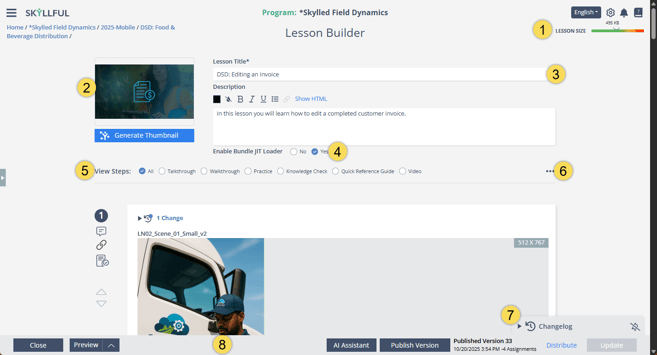
The Lesson-level layer. Nothing here belongs to a single step.
# |
Control |
What it does to the Lesson |
|---|---|---|
| 1 | Lesson Size gauge | Shows the size of the whole Lesson against a green to red scale. Larger Lessons take longer for Learners to download. |
| 2 | Thumbnail and Generate Thumbnail | Sets the image Learners see for the Lesson. Maximum 5 MB. |
| 3 | Lesson Title and Description | The Lesson's name and the description Learners read before they start. Not to be confused with a step's Name and Description. |
| 4 | Enable Bundle JIT Loader | Controls when Simulator downloads the Lesson's content. Yes, the default, loads each step as the Learner reaches it, so the Lesson opens faster. No loads every step in the background instead. |
| 5 | View Steps filter | Filters the whole step list down to one mode so you can work through that mode in isolation. It changes what you see, not what the Lesson contains. |
| 6 | Lesson Overflow menu (...) | Lesson-wide commands. Step Actions here acts on EVERY step at once. Also holds Download, the changelog controls, Copy Lesson Link, Copy Version Link, the screenshot handling toggles, and Archive for the whole Lesson. |
| 7 | Changelog panel | Every version of the Lesson, with author, date, and edit count. Selecting the bell follows the Lesson for change notifications. Collapses out of the way. |
| 8 | Bottom action bar | Close, Preview the whole Lesson, Publish Version, Distribute, and Update. |
Note: There is a ninth Lesson-level control, and it is not numbered on the image because it hides at the very edge of the screen. A narrow tab flush against the left side of the window opens the screen tray, a panel listing every screen in the Lesson in step order, each with its type badge. It is the quickest way to see the shape of a long Lesson, and dragging a screen inside it reorders the steps. See Modify Lesson Steps.
Note: Lesson Builder does not save your work automatically. Nothing you change is kept until you click Update, so closing the Lesson, losing your connection, or letting the session time out before then loses everything you have done since the last save. Get into the habit of clicking Update as you finish each step rather than saving up an hour of work for one click at the end.
Note: Update saves the whole Lesson, not just the step you were last editing. One click commits every pending change on the screen.
What affects only the step you are in?
Everything inside a step card, and the rail down its left side.
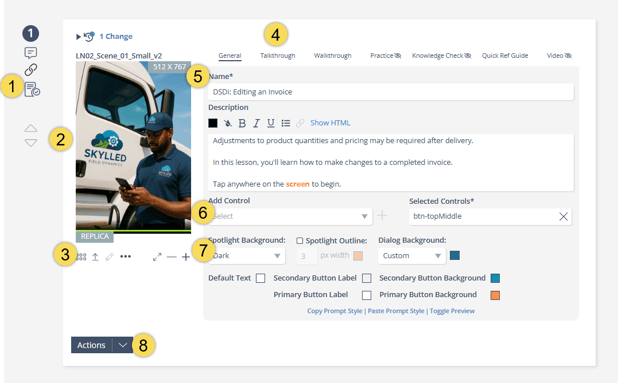
The step-level layer. Everything here belongs to this step alone.
# |
Control |
What it does to the step |
|---|---|---|
| 1 | Step rail | The step number, plus Comments, Link, and Approve for this step, and the sort arrows that move it up or down. All three icons stay disabled until the step is saved. |
| 2 | Screen panel | The Replica on this step, with its file name above it and its dimensions in the corner. |
| 3 | Screen controls | Screen Library and Upload Screen to change this step's screen, the edit pencil, a ... menu, the viewer choice (Use Top Viewer or Use Side Viewer), and zoom. |
| 4 | Step tabs | General for the step itself, then one tab per mode. A crossed-out eye on a tab means this step is excluded from that mode. |
| 5 | Name and Description | Both are Learner-facing. Simulator puts the Name at the top of the Walkthrough prompt, beside the step count, and the Description in the body below it. Name is required. |
| 6 | Add Control and Selected Controls | What the Learner acts on for this step. Required. |
| 7 | Prompt styling row | Spotlight Background, Spotlight Outline, and Dialog Background for this step's prompt, plus Copy Prompt Style, Paste Prompt Style, and Toggle Preview. |
| 8 | Actions | This step's own menu: Archive, Duplicate Step, and Duplicate Step and Screen. |
Note: The General tab is the step. Build it and you have built Talkthrough, Walkthrough, Practice, and Knowledge Check for that step, because all of them take their content from General. Editing an individual mode tab customizes that one mode on that one step. It is worth doing when a mode needs to say something different, but a complete Lesson does not require it.
Which controls are easy to confuse?
Several commands exist in both layers under nearly the same name. These are the pairs worth knowing before you click.
If you want to affect |
Use this |
Not this |
|---|---|---|
| The prompt style on one other step | Paste Prompt Style on the step's General tab | Step Actions then Paste Prompt Styles to Steps, which applies it to every step |
| The prompt style on every step | Step Actions then Paste Prompt Styles to Steps in the Lesson ... menu | Paste Prompt Style, which only does the step you are on |
| Checking one prompt in place | Toggle Preview on the step | Preview in the bottom bar, which runs the whole Lesson as a Learner |
| Removing one step | Actions then Archive on that step | Archive in the Lesson ... menu, which retires the entire Lesson |
| Leaving one step out of a mode | The step's mode tab, which shows a crossed-out eye when excluded | Include All Steps or Exclude All Steps in Step Actions, which changes every step |
| Naming the Lesson | Lesson Title at the top | The step Name, which is internal to that step |
What if the screen does not look like this?
ymptom |
What to do |
|---|---|
| The step tabs and the screen controls are not visible | The screen panel is taller than the window. Scroll down past the Replica; the controls sit directly beneath it. |
| The Changelog panel is not there | It only appears on a Lesson that has been created. A new Lesson has no versions yet. |
| The Changelog panel is covering the Lesson ... menu | Collapse the panel with the arrow beside its title. It collapses to a bar in the corner. |
| Publish Version, Distribute, and Preview are unavailable | The Lesson has not been created yet. They become available after you click Create. |
| A panel of screens has appeared down the left and pushed everything across | That is the screen tray. Close it with the same narrow tab at the left edge that opens it. |
If you need help, start with your manager, then your Local Administrator. If additional assistance is needed, your Local Administrator can submit a support ticket to Skyllful.
Skyllful Knowledge Base | Content Developers, Instructional Designers