
How do you open Replica Maker?
Way in |
What happens |
|---|---|
| Straight from conversion | When you convert screenshots to Replicas, the converted screens open in Replica Maker for you. This is the usual path. |
| From the Screen Library, one screen | Click the ... menu on the screen you want and select Edit. The editor opens on that screen alone. |
| From the Screen Library, several screens | Click Select, click the screens you want, then choose Actions > Edit. Replica Maker opens with all of them loaded. |
Working on several screens at once. Opening screens through Select > Actions > Edit adds a panel of screen thumbnails down the left side of the editor. Click a thumbnail to move to that screen without closing Replica Maker and going back to the Screen Library. Each thumbnail also has an X if you want to drop that screen from the set, and the panel collapses when you need the room. When a set of screens share a layout, this saves a lot of opening and closing.
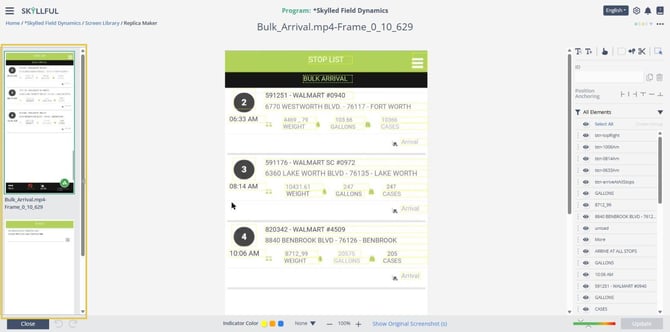
*Opening screens through Select > Actions > Edit puts every screen you picked in the panel on the left.*
What is each part of Replica Maker?
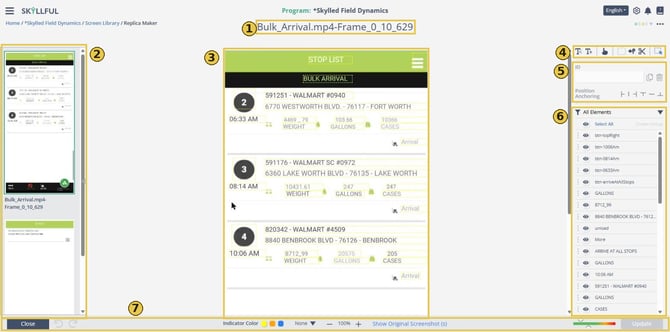
*The seven regions of Replica Maker, numbered to match the table.*
# |
Region |
Where |
What it is for |
|---|---|---|---|
| 1 | Screen name | Top center, under the breadcrumb | Tells you which screen you are editing |
| 2 | Screen panel | Left side, when you opened through Select > Actions > Edit | Thumbnails of every screen you opened. Click one to switch to it, or X to drop it from the set. |
| 3 | The Replica | Center | The background with every element on top. This is your working canvas. |
| 4 | Tool toolbar | Top of the right panel | Text Extract, Text Add, Button Add, Background Fill, Background Revert, Image Clipper, and Selection Mode |
| 5 | Element properties | Right panel, below the toolbar | Changes with what you have selected. Always shows the ID field and Position Anchoring. Text elements add Text Properties. Selecting more than one element adds Align Edges. |
| 6 | All Elements list | Right panel, lower | Every element on the screen. See the next section. |
| 7 | Bottom bar | Across the bottom | Close, undo and redo, Indicator Color, Select Frame, zoom, Show Original Screenshot (s), the size meter, and Update |
Note: Nothing is saved until you click Update. Closing without it gives you an Unsaved Changes prompt with Cancel, Don't Save, and Save.
How do you use the All Elements list?
The All Elements list is the inventory of everything on the screen. It is often faster to find an element here than to hunt for it on a crowded Replica, and selecting a row selects the element.
The list groups by type. Buttons appear first, then text.
Buttons and text are labeled differently. A button shows its ID, so you see
btn-searchBar. A text element shows its actual text, so you see06:33 AMeven though its ID istxt-0633Am. If you are searching the list for an ID that starts withtxt-, you will not find it. Look for the words instead.
Names follow a prefix convention. Skyllful names elements as it creates them:
btn-for buttons,txt-for text, andGroup1,Group2and so on for groups. Keeping the prefix is what makes elements easy to pick out later, especially in the Lesson Builder's control lists.
Control |
Where |
What it does |
|---|---|---|
| Type filter | The dropdown on the All Elements header | Narrows the list to Text Elements, Button Elements, or Image Elements |
| Eye icon, header | Beside All Elements | Hide All Elements at once |
| Eye icon, row | Left of each name | Hide Element or Show Element, one at a time |
| Select All | Top of the list | Selects every element on the screen |
| Create Group | Top of the list | Groups the selected elements, which is also how you build a scroll group |
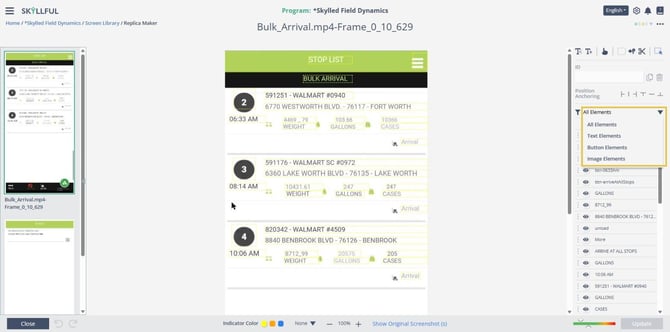
*The type filter is the fastest way to cut a long list down to just the buttons or just the text.*
Reordering the list. Each row has a grip on its left edge. Drag a row to move it, and the new order is kept when you click Update.
What if Replica Maker does not work as expected?
Contact your Local Administrator first. If your Local Administrator cannot resolve the issue, submit a case through the Skyllful support portal.
Skyllful Knowledge Base | Content Developers, Instructional Designers